
Building an eLearning gamelet - The technical build
With storyboarding and graphic design work advancing well, now is the time to make the gamelet come to life. It’s time to build it! If you want to see how we built it, you can see the time-lapse video above.
As mentioned in previous posts, our weapon of choice in regards to authoring tools on this occasion is going to be Storyline - you can read more about why by reading this blog about the Technical PoC process.
This blog article could easily run to thousands of words so, to keep it short, I'm not going to cover set-up such as setting up the project, importing graphics etc. The main focus points of this post will be around the animations, scoring system, and accessibility.
Storyline’s timeline helps bring animations to life
Storyline can be much easier to use when it comes to simple animation that doesn’t require bespoke code than a lot of other authoring tools, mainly due to the presence of a timeline. Using the timeline allows us to accurately plot our trigger actions. By utilising Storyline’s built-in motion paths, we can easily animate any object on the page to bring a high level of Learner engagement.
Due to this gamelet mimicking the style of a side scroller game, the appearance of horizontal character movement is created by the background images scrolling from right to left, which gives the illusion of the character moving on the screen when in actual fact the characters x position stays stationary for the majority of the gamelet. The jumps and falls between platforms then become much simpler with just a curved motion path going straight up and down. We use the timeline to scrub between when the character is at the end-point of one platform and the start of the next one; we then take the duration between them, giving us the duration for our animation. It really is as easy as that.
Using the parallax function to create perspective
With the background scrolling from right to left, we can take the opportunity to use another trick within our Storyline toolbox and create a parallax effect on the background. By separating the background image into multiple layers - and changing the amount they move depending upon suggested distance away from the character along the z-axis - we get the effect of perspective and a lot more depth to the scene.
Use scoring to create user engagement
The scoring system for this project uses fairly typical functionality that many readers may be familiar with. Namely, using a variable to help us keep or remove an item from our score bar dependent upon the outcome of the question. Since we’re not keeping a numerical score here and are showing progress graphically, the variable only needs to define whether or not a brain point should be removed from the score bar. So if the answer is correct, do nothing, and if the answer is wrong, add 1. We then use an action on the beginning of the next screen to change the state of the score bar to display the correct amount with an IF condition set to the variable and its done, really very simple.
Building for accessibility from the start
We need to ensure that no matter the person who is viewing this gamelet, they are able to get an equivalent experience regardless of disability. As previously mentioned within the initial concept, we are going to offer both closed captions and audio description to accomplish this goal. For the closed captions we can import our text and use Storyline’s built-in functionality to convert into a ‘cc file’. Using an icon that is present throughout the entire gamelet, we assign an action based upon a user click which sets a variable ‘Player.DisplayCaptions’ to either true or false depending on whether the captions are currently displayed or not. There is a bit more that goes into it than that, but that covers the basic steps. To trigger the audio description we do something very similar and set a trigger to set ‘audioOn’ to true or false depending on whether the user has clicked or not.
Automatically adjusting animations to a user’s accessibility settings
When it comes to stopping the motion of the animations, for users that may struggle with moving objects, we could simply create a button with an assigned trigger that pauses the animation upon when it is pressed. While this would be an okay solution, we can go one step further by using a bit of javascript.
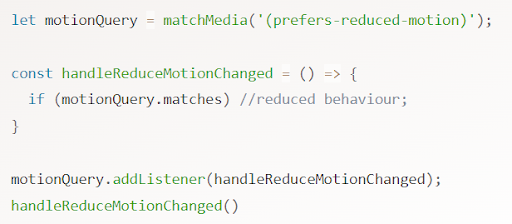
Using the code above we can check within a user’s system settings and automatically trigger “no animations” if a user prefers reduced or no motion. It’s not as simple as just dropping it in as you need to specify actions and objects for it to act upon, so this is something that I will be sharing in a future video so stay tuned for an in-depth look at how it works. Get in touch if you have any questions or want us to share the video with you when it is released.
This covers the majority of the complexity within this project, I have omitted the contact form aspect as this was discussed in the Technical Proof-of-Concept post, so if you want to learn more about the work behind that then you can view that post by clicking here.
Thank you for reading our content, and please feel free to share content if it is helpful to other people.
You can follow us on LinkedIn for regular updates and get in touch by email - team@konnektis.com, phone - +44 (0)330 043 0096, or with the Contact Form below if you would like to speak to one of the team.